

Materials needed:

1. Cutting mat
2. Ruler (I'm using a quilting ruler)
3. Faux Leather
4. Sharp penknife/craft knife

5. Punch (I'm using a border punch from Martha Stewart's line of punches)
6. Sticky tape/paper tape/painter's tape
7. A4 size printer paper (I'm recycling a used one)
8. Freezer paper
9. Paint brush
10. Acrylic paint(s)

11. Needle (for leather sewing if possible)
12. Thread (for leather sewing if possible)
13. Elastic tape (I'm using a 10mm wide tape)
14. Heavy duty glue (eg. UHU, Bostik, E6000 etc)
15. Clamps or clothes pins (or anything heavy to put atop 2 glued leather pieces)
16. Sharp scissors
The materials used in this project might be slightly more than my other Last Minute Gifts tutorials, but I can ensure you that this project is an easy one. Okay, let's start!
First of all, cut out 2 pieces of faux leather (each 1 in wide by 7 in long) using the penknife or craft knife. Faux leather does stretch a little, and the 2 strips might warp a little. It's okay as we can trim them down in the last few steps using a pair of sharp scissors.
Next, we need to create our stencil for our bookmark. There are many ways to do this, but since I've freezer paper and a pretty cute border punch on hand, I decided to use those. (For those who do scrap-booking, I believe there's a type of adhesive that can be used to adhere stuff temporarily. It would be a very good idea to use that with your paper stencil.)
Martha Stewart's punches do not punch well into just freezer paper alone, and it needs some sort of a stabilizer. What I did was to tape a strip of freezer paper (deep enough for my punch) to a piece of normal printer paper.

When punching, both pieces of paper will be within the punch with the printer paper acting as a stabilizer.

Start punching until it is slightly longer than 7 inches.

As this particular punch creates a positive cut-out of the birds and wire (instead of holes), I snipped the tail area of the birds and the ends of the wire to create a stand-alone stencil.

Then, place this stencil on top of one of the faux leather strips.

After positioning where you want the stencil to be, place a piece of cotton fabric over the stencil and faux leather, making sure not to shift anything.

Iron with a low-heat setting to adhere the freezer paper stencil onto the faux leather.

Once the freezer paper stencil is properly adhered to the faux leather strip, set it aside to cool a bit on your work area. I wanted to leave the top and bottom edges of the faux leather strip unpainted, so I blocked away those edges with sticky tape.

Next, prepare the color(s) you are going to use to paint on the faux leather. I mixed dark purple with white to create this beautiful shade of light lilac color (please do not thin your acrylic paint with water).
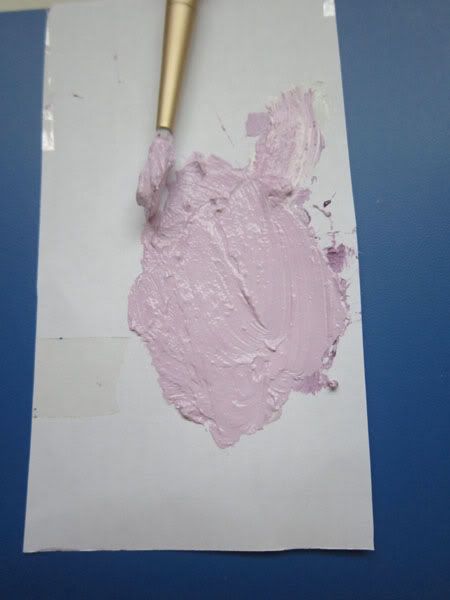
Next, using your paint brush, apply paint onto the faux leather.

Once you have finished painting, let the acrylic paint dry for at least 30 minutes (or you can use a hairdryer to speed up the drying process) before removing the stencil.

The next step is to glue the 2 buttons onto the stenciled faux leather piece, one on each end.

Next, sew through the button holes to further secure the buttons to the faux leather piece. After tying a knot to secure the thread ends, snip the ends about 1/2 inch away from the knot. Apply some glue over the knot and the ends to further secure the thread (especially if you are using waxed thread meant for leather sewing).

Once the glue is dried, apply a layer of glue generously all over the back of the stenciled piece, and position the elastic tape like so:

Then place the other faux leather piece over the stenciled piece, sandwiching the elastic tape:

As the glue I used required some external pressure for the faux leather pieces to adhere to each other properly, I used my clamps to do the job. (Boy, was I surprised to find them at our SGD$2 store called Daiso)

I let them sit for about an hour or so before removing the clamps. After removing the clamps/the glue is dried, you can trim and neaten any excess warped edges. For me, I also rounded the corners.

The bookmark's now almost done. However, to prevent the elastic tape from having the possibility of coming undone (it happened for my test bookmark), secure the ends of the bookmark with some running stitches.

After finishing the running stitches in one direction, sew again in the other direction so that the gaps within the previous running stitches are covered by this set of running stitches. Once you've reached the end, ensure that the ends are at the back of the piece.

Tie a square knot and dab a little bit of glue on the knot. After the glue is dried, trim the ends off. And voila, the bookmark is done!


No comments :
Post a Comment